
This content may include affiliate links, which means if you click on them, I may get a commission. The cool thing is, there’s no extra cost to you!
Yogurt Tub Craft – 3 DIY Cake Plate Ideas
This post is sponsored by Mountain High Yoghurt. All opinions are 100% my own.
Ever looked at a plastic container and thought, “I should MAKE something with that …”? Me too! All the time. So when I got a pack of 6 large tubs of Mountain High Yoghurt, I had a lightbulb moment. I love cake plates but they are crazy expensive. If you're like me, you probably want to have a BUNCH of cake plates in different sizes and shapes and colors for every occasion. I started searching online and found 3 great looking cake plates to knock off … with yoghurt tubs! Yup, this yogurt tub craft is super easy so grab your glue bottle and let's get started making these three DIY cake plate ideas with yoghurt tubs.

Why DIY instead of buy
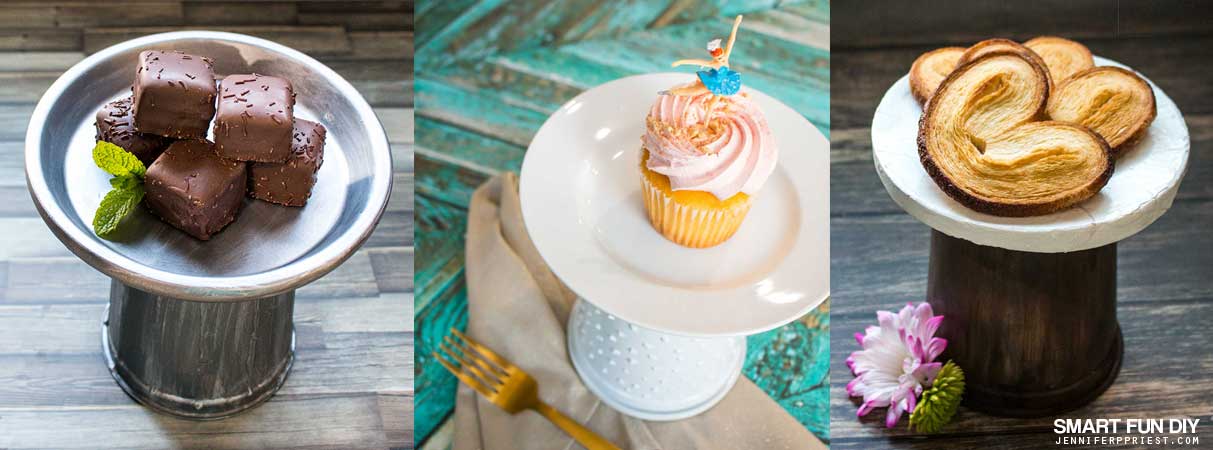
I drew inspiration for the cake plates I made from a few images I found online through Pinterest and from some of my favorite retailers. I made a collage of the cake plates I liked best to use for reference while I was making the faux cake plates.

Why make faux cake plates rather than just buy them?
I love having a variety of dishes and cake plates to use for every occasion but I love saving money too. The cake plates pictured above cost upwards of $50 each and some are over $100 each! And let's be honest; most of us will only use our cake plates one to two times per year. That's alot of money to spend for something we won't be using often.
If your tastes bounce around from modern to farmhouse to classic to rustic, like me, then it doesn't make sense to buy cake plates in every single style. But it does make sense to make your own cake plates in whatever style you need for today.
Upcycling plastic yoghurt tubs
And that brings up another good idea: upcycling. Any time we can be more conscious about reusing or upcycling an item so it has a longer life, I'm all for it! So when Mountain High Yoghurt challenged me to make something with their Yoghurt tubs, I wanted to go beyond using them for pen cups or paint buckets or planters. Mountain High Yoghurt is a great value for a great price so it would make sense to get even more value out of it by using the tub too!
I thought about what would I really love more of but don't want to buy. You can turn Yoghurt tubs into just about anything. And cake plates; that's gonna be easy peasy!
You can make a lot of cake plates!
One way to make a dessert table, holiday dinner spread, or even a candy table at a party look really expensive and lavish is to have excess. A great way to get that look of “plenty” is to have multiple dishes at varying heights, all holding multiple items. With traditional cake plates, this could cost upwards of $1000 to do a party spread right. Save your Mountain High Yoghurt tubs, big and small, and upcycle them into multiple cake stands to make any party decor or theme.
Here are some ideas for using these upcycled yoghurt tub DIY cake plates:
- On a snack table at a party – make cake plates of varying heights and widths and stack them on boxes of varying heights to give the table lots of interest. Place small snacks or desserts on top of each plate.
- As centerpieces – stack multiple DIY mini cake plates like these in the middle of a table. Surround the bases with flowers, greenery, or succulents and then place snacks or other decor on top, like sea shells, small votive candles, or table scatter.
- For name cards and menus – at a sit down dinner, place menu cards or the name cards on these mini cake plates at the top of the place setting.
- On your desk – place a plant, pencil cup, or even a candle on one of these to make your desk look more special.
Think outside of the “tub”
The best ideas happen when you challenge yourself to step outside of your comfort zone. A great idea doesn't have to be complicated. In fact, the best ideas are often simple.
Just like you can use cake plates for more than just cake, you can use Mountain High Yoghurt for more than just breakfast and smoothies. Last night we used Mountain High Yoghurt to make two Food Network recipes for dinner: Roasted Vegetables with Chipotle Cream and Indian Spiced Chicken, which we served over basmati rice. Think outside the “tub” for meals and DIY projects next time you pick up Mountain High Yoghurt.

Tips for Making DIY Cake Plates with Yoghurt Tubs
Now, before we dig in, there are a few things you need to gather and need to know in order to make this project a success.
An empty yoghurt tub is pretty lightweight and might topple over if you put something heavy on top. Fill the tub with glass marbles from the dollar store and then snap the lid back on. The weight will keep the yoghurt tub base of the cake plate steady while people serve themselves.

You can add decorative patterns and lines to the tubs with glue before painting them. Use a white glue like Aleene's Tacky Glue rather than hot glue. White glue takes a little longer to dry before you can paint the tub but hot glue can melt the plastic.
As far as the “plate” part of the cake plate, the sky is the limit:
- get plates at thrift shops or dollar stores to save money
- look for unique shapes, like ovals or plates with fluted edges
- use your current salad or dessert plates to save money
- look for disc shaped items like faux stone stepping stones or chargers at the dollar store and thrift shops
- use a wood slice or other unique material
If cake plate itself is not food safe, place a plate, doily, or cardboard round on top and then add the snacks or goodies on top of that.
If you're using your nice plates, you won't want to glue them to the yoghurt tub base to make the cake plate. Use a removable mounting putty, like the putty used to hang posters, to hold the plates onto the tubs so you can remove the plates and wash them later.
Watch this video to see how to make three different DIY cake plates using Mountain High Yoghurt tubs. Each of these tutorials below has a supply list in this post below so scroll down, choose the project you want to make, and then gather your supplies. Start thinking about other items you might already have around the house that you can use to make your version of these cake plates.

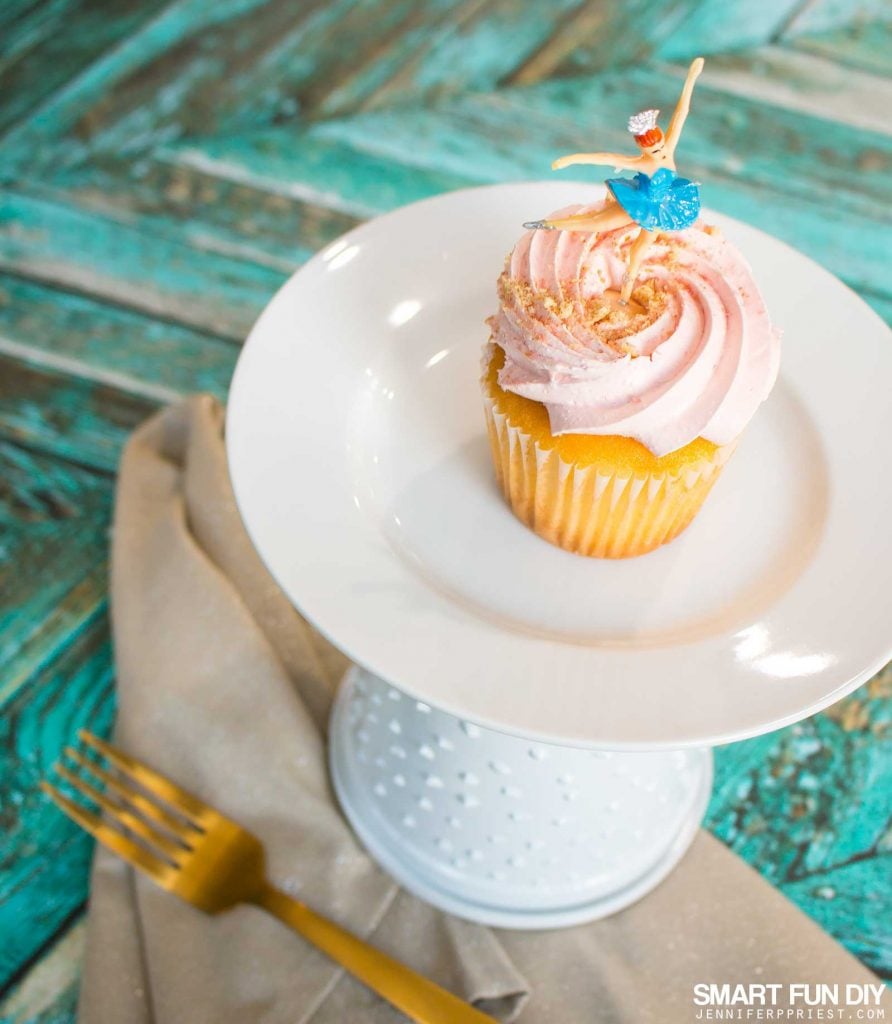
DIY Hobnail Cake Stand with Yoghurt Tub
Hobnail glass and milk glass have gotten so popular that it's harder to find any pieces for a good price. But did you know that you can get the hobnail look on almost anything using puffy paint? Yeah, that stuff from the 80's!

You'll need these supplies:
- Mountain High Yoghurt Tub, empty and washed
- Tulip Slick Dimensional Paint
- white spray paint
- mounting putty
- white dessert plate or saucer
On a clean, empty Mountain High Yoghurt with the lid on, add dots of Tulip Slick Puffy Paint. If precision is your thing, you can mark the placement of the hobnails by making dots with a marker and then add the dollops of puffy paint on top. If you like to fly by the seat of your pants, start at the bottom of the tub and make a row of dots parallel to the bottom of the tub. Then keep making rows of dots parallel to the previous line of dots until the sides of the entire tub are covered with dots.

You can vary the size and spacing of the dots to mimic real hobnail glass cake plates. Avoid making the dots too large (more than 1/4″ wide) because they will sag and slide under the own weight while they dry. Once the tub is covered with dots, set aside to dry for at least four hours. After the tub is dry, apply one coat of white gloss spray paint over the entire tub. Allow to dry and add a second coat if needed to cover the branding on the tub.

Fill the tub with glass marbles to weight it down; then replace the lid. Add a white ceramic plate on top, using mounting putty to hold it in place.
Modern Walnut Cake Stand with Faux Marble Top with Yoghurt Tub
I have been eyeing these wood base with marble top cake plates for years but the price and the worry about it breaking always deter me. Who knew you could get the look for a dollar?!

Okay, I know that it looks like a yoghurt tub base because you and me, well, we KNOW it's a yoghurt tub. But imagine these stacked at different heights on a dessert table at a pretty bridal shower or birthday party … luxe celebration decor for a fraction of the cost!

Here's what you'll need:
- Mountain High Yoghurt Tub, empty and washed
- Aleene's Ultimate Adhesive
- brown acrylic paint (in 3 shades) – Folk Art Multi-Surface in Cinnamon, Delta Ceramcoat in Brown Velvet, and Delta Ceramcoat Select Satin in Bamboo
- chalk paint in brown, white, and grey – Waverly Inspirations Chalk Paint in White, Folk Art Home Decor Chalk in Java and Parisian Grey
- antiquing stain (optional) – Folk Art Painted Finishes Painted Barnwood Effect in Barnwood
- foam paint brush
- dollar store stepping stone
- flat paint brush
- small detail paint brush
- paper towel or sponge (for texture)
- clear spray sealer
- hammer and chisel
This cake plate is not food safe so you'll need a doily or some other item between the cake plate top and the food itself. If you're using this DIY cake plate for home decor, no problem!

The marble top was going to be the most expensive part of the project. I was in a local dollar store and saw some faux stepping stones for the garden. When I turned them over, the back was smooth and stone-like, perfect for making a piece of faux marble. And it only cost a dollar!

Depending on what's on the front of the stepping stone, you might need to chisel away some of the design to make the front of the stone flat enough to glue to the yoghurt tub. Paint the stone with chalk paint in white to cover and allow to dry. Chalk paint is great for this kind of project because it sticks to pretty much everything and when you're getting supplies from the dollar store, it's hard to know what they're made of to know which paint will stick; chalk paint sticks to pretty much everything without sanding.

Dip a tiny brush into water and then dip it into the light grey chalk paint. Carefully drag the brush over the white stone with very light pressure to paint the veins of the “marble” top. Allow to dry. Spray paint with a coat of clear sealer and allow to dry for at least three hours.
![]()
While the “marble” is drying, paint the yoghurt tub with brown chalk paint and allow to dry. Be sure to paint the rim of the tub too. Then dry brush on acrylic paint in three other shades of brown to add depth to the base and make it look more like wood. Allow to dry.

This step is totally optional but it will make the brush strokes on the yoghurt tub look more like wood grain than paint brush strokes. I did not share this step in the video:
Once dry, paint on the barnwood finish with a foam brush for a more aged look. Gently wipe away the excess finish. If you rub the tub too hard, the paint will come off. If that happens, dab more brown chalk paint over the area to cover and then repeat the steps above.

Once the tub is dry, attach it to the “marble” top with Aleene's Ultimate Adhesive or another strong adhesive like construction adhesive. Again, this cake plate top is not food safe so place a food safe material like a doily or plate between the food and the “marble” top.
Faux Tin Cake Stand on top
I have a weakness for metal decor even though my house is pretty sleek and modern. Tin can go either way – you can go country or rustic farmhouse, industrial, or modern. The bad part about tin is that it dents easily.

This DIY cake plate is made with a yogurt tub and a clay saucer for a terra cotta pot! Why not? You can turn the saucer “plate” of this cake plate up or down to get different looks too.

Supplies:
- Mountain High Yoghurt Tub, empty and washed
- Aleene's Tacky Glue
- silver acrylic paint – Folk Art Brushed Metal High-Hide Acrylic Paint in Brushed Pale Silver and Brushed Dark Gray
- texture paint – Folk Art coastal Texture Paint in Seal Grey
- foam brush
- clay saucer
- mounting putty

To get the raised lines on this DIY cake plate we used white glue. Run a bead of Aleene's Tacky Glue down the side of the yoghurt tub in lines and allow to dry. It might pool and drip while drying so if you don't like that drippy solder look, periodically check on it while drying and use a toothpick to smooth out the bubbles and drips. Once the glue is dry, paint it with a textured paint, like Plaid Coastal Texture Paint, in grey. The texture paint makes the tub feel like rough metal, adding to the rustic feel but if you don't have texture paint you can try this:
- mix dry embossing powder (from the rubber stamping section of the craft store) with the acrylic paint to make it textured
- use chalk paint instead

After painting the tub and allowing it to dry, dry brush the tub with metallic paint in two shades to give the project depth and an aged look. Paint the clay saucer with the darker metallic paint first and allow to dry. Then dry brush it with the lighter metallic paint. Remove the lid from the yoghurt tub and be sure to cover any white areas of the tub with paint.

After drying, attach the clay saucer to the bottom of the yoghurt tub with mounting putty.

This cake plate top is not food safe so place a food safe material like a doily or plate between the food and the “marble” top.
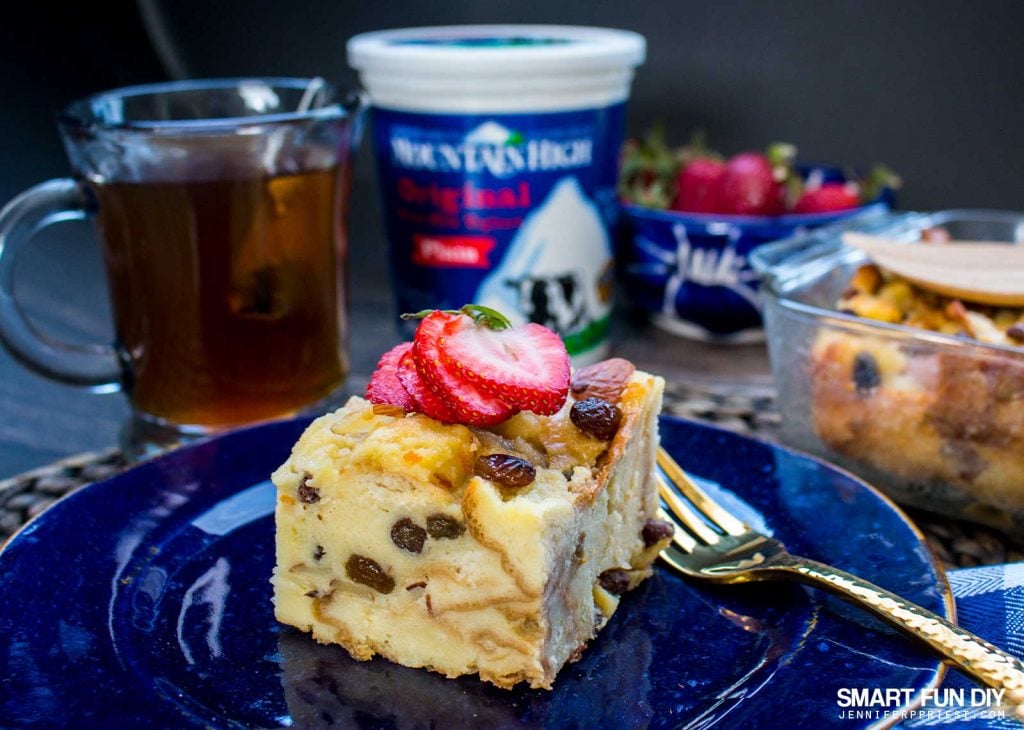
Ready to eat more yoghurt so you can make these? Try our Homemade Bread Pudding Recipe with Mountain High Yoghurt. YUM!
Click here to purchase Mountain High Yoghurt.
How would you use these DIY cake plates?


About the Author

Jennifer Priest is a 20+ year designer in the arts & crafts industry and home DIYer with a passion for creativity. An Army veteran raised on a ranch, from her experience, she shares smart DIY projects that save money and fun craft ideas that anyone can make. Besides blogging, Jennifer is a Master Practitioner and Trainer of NLP, Hypnosis, and MER, and coaches other online entrepreneurs on money mindset, business, and living an intentional life. When not blogging, Jennifer is having adventures in the wilderness, on road trips, playing with her cats, and making paleo food.


This is absolutely BRILLIANT, Jennifer! Such an incredible transformation and upcycle. Can’t wait to use my Coastal paints!