

This content may include affiliate links, which means if you click on them, I may get a commission. The cool thing is, there’s no extra cost to you!
How to Make ICE Resin Jewelry – the Basics
Since I started working with ICE Resin as their social media coordinator in 2013, so many people have told me that they are scared to buy ICE Resin! Noooooo! It's super easy…. Or worse, they told me they bought ICE Resin and it is sitting in a box somewhere because they are afraid to use it. Here are two things you need to know if you are wanting to get into making resin jewelry with ICE Resin:
- ICE Resin is super easy to use, very forgiving, and you can even fix a boo boo if you make one.
- ICE Resin has a shelf life of about a year in the package, so get it out and use it!
Here's a video I made with the folks at Scrapbook Expo about how to mix ICE Resin and pour it into a bezel. Seriously, this is soooo easy, even scrapbookers can do it. Teeeheee. I poke fun at scrapbookers but really, yes, us scrapbookers can do this! Imagine adding photos, bits of ephemera and pretty lace and papers to make bezels for gifts, to attach to the front of your scrapbook. Seriously. We can all do this!! In this video, I share how to make ICE Resin jewelry, from a scrapbooker's point of view: This post contains affiliate links.
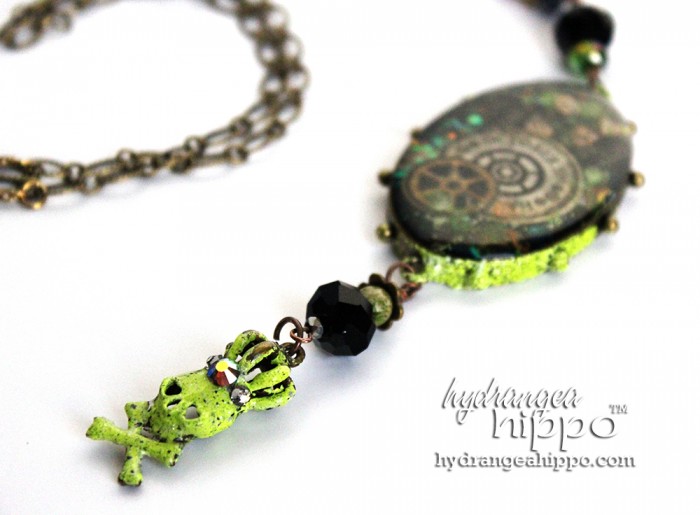
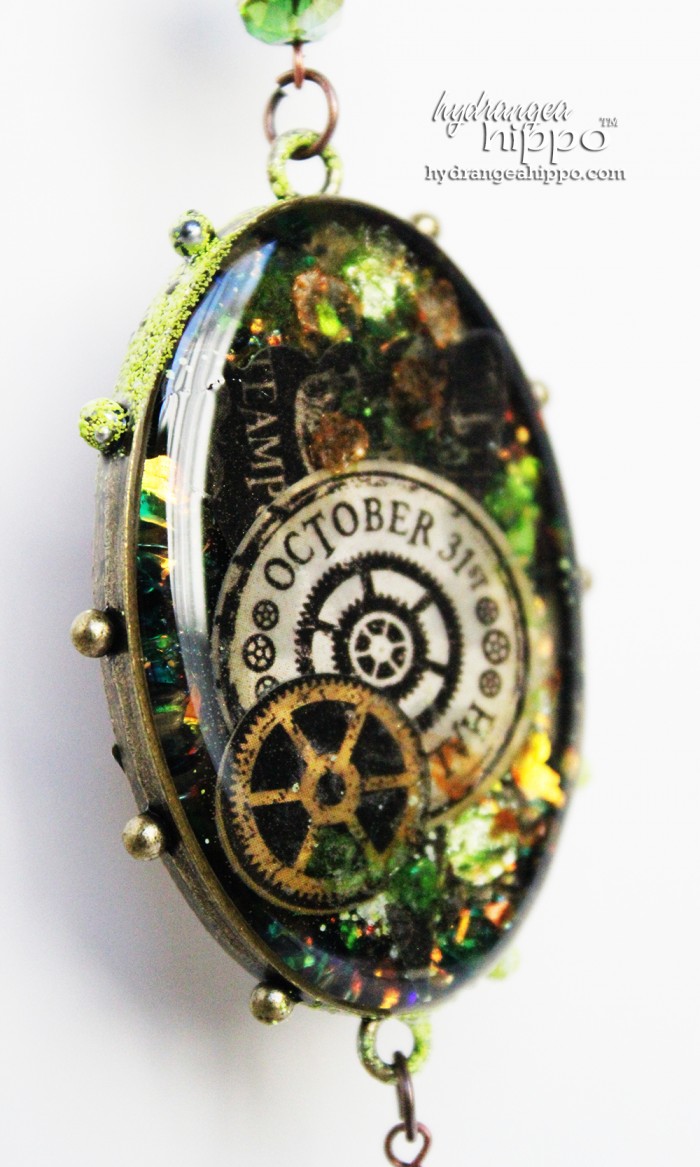
I used Graphic45 Steampunk Spells paper to make the bezels in the video. I know how we all love our scrapbook paper so much — isn't this a great to use it in a way where you can admire the paper every day, in a jewelry piece that you can wear? To get the green on the edges of this piece I used Iced Enamels, also from Susan Lenart Kazmer ICE Resin. Iced Enamels is amazing but I would say wait to get it until you are in love with ICE Resin.
If you can't wait to get started with ICE Resin, I'm so excited for you!
Here are some of the supplies you'll need to make ICE Resin jewelry:
You'll be ready to start making your very own ICE Resin jewelry in no time! Here's everything you'll need to start creating jeweler's grade resin pieces of your own:


ICE Resin comes in larger bottles but they require you to measure out each part of the ICE Resin prior to mixing and they come in bulk. I recommend starting out with the 1 oz. ICE Resin “plunger” since it automatically measures each part of the ICE resin when you depress the handle and it is an easy-to-use amount of ICE Resin. The plungers cost about $12, which is pretty affordable for a new product to try out! Once you get a feel for how the resin should look while mixing and if you love the product, then you can “graduate” up to those big bottles that the pros like Susan Lenart Kazmer and Jen Cushman use. Me? I still use a plunger every now and then. They're easy!
You'll need a few “bezels” – that's what the trays where the paper, bits and baubles, and resin sit in and cure in to make a pendant. One plunger will make about 5-12 bezels, depending on the size of the bezel and how much resin you put in each bezel.
If you plan on putting paper into the bezel, it will need to be sealed. ICE Resin will soak into any porous surface, making it translucent. It's great when you're going for that effect but if you wan the photograph you put in your bezel to still look like Aunt Myrtle when you're done, you'll need to seal the front, the back and the sides of the photo before pouring ICE Resin over it. ICE Resin's paper sealer is the sealer I use.
Plastic gloves will protect your hands. These are chemicals so wearing gloves is a good idea.
Are you intimidated by ICE Resin? Let me know in the comments – let's get creating with ICE Resin together! Also, check out this post to see how I fixed a boo boo I made in my ICE Resin piece.
About the Author

Jennifer Priest is a 20+ year designer in the arts & crafts industry and home DIYer with a passion for creativity. An Army veteran raised on a ranch, from her experience, she shares smart DIY projects that save money and fun craft ideas that anyone can make. Besides blogging, Jennifer is a Master Practitioner and Trainer of NLP, Hypnosis, and MER, and coaches other online entrepreneurs on money mindset, business, and living an intentional life. When not blogging, Jennifer is having adventures in the wilderness, on road trips, playing with her cats, and making paleo food.


Got here from FB!
Beautiful work, really nice
This is so cool – I am excited to try it! Thanks for sharing and I appreciate the resource list too! 🙂
I absolutely need to get some of that resin and make broaches! You made it look really easy.