

This content may include affiliate links, which means if you click on them, I may get a commission. The cool thing is, there’s no extra cost to you!
DIY Mantel Makeover #CompleteWithGlade
This shop has been compensated by Collective Bias, Inc. and its advertiser. All opinions are mine alone. #CompleteWithGlade #CollectiveBias
That's the American Dream right? A home with a fireplace and a mantel for decorating, hanging stockings on, and gathering around. When we bought our house almost 10 years ago, our fireplace and mantel was anything but dreamy. Luckily, making over your mantel and fireplace surround is a weekend job with a little help from The Home Depot. Making that new mantel part of your home, well, that's where Glade® comes in!
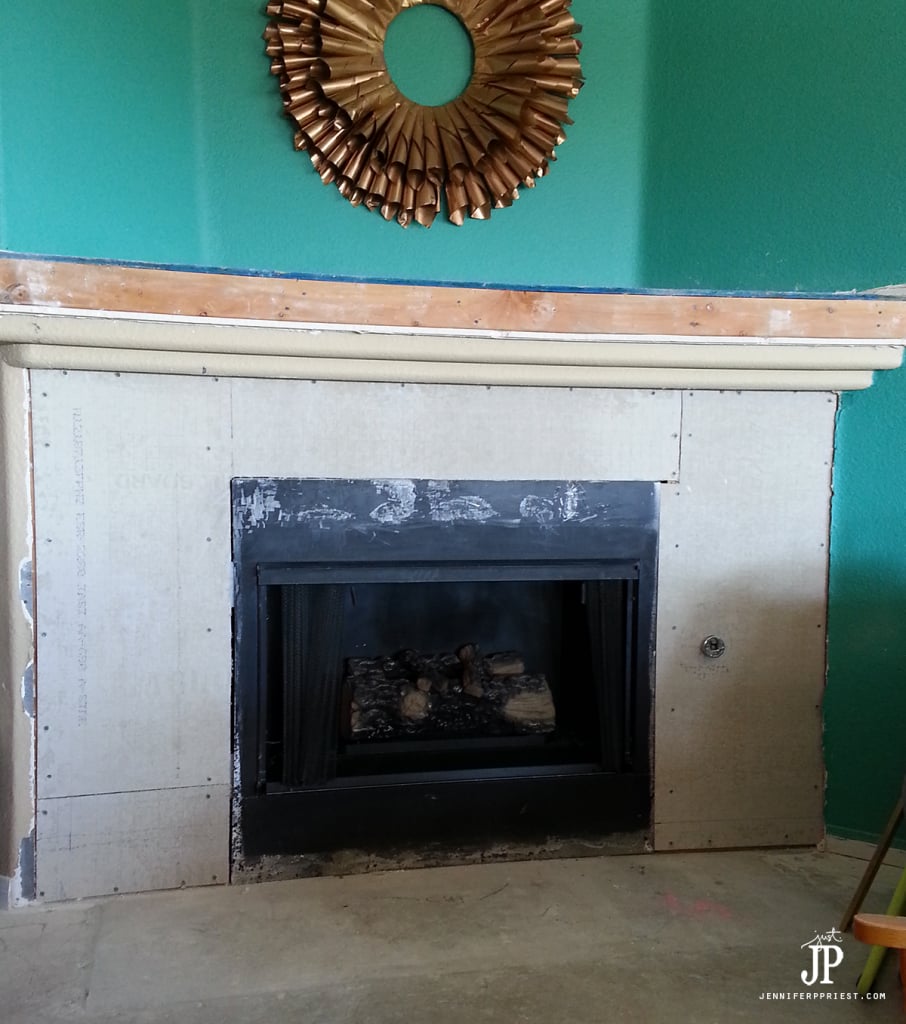
Our fireplace was ugly. Here's what was wrong with it:
- the metal part (black) was scratched, which made it look dirty all the time
- the rock surround was the same rock used on the front of our house and it was falling off. It was too rustic for our style!
- the mantle was drywall with rounded corners and textured finish. U-G-L-Y!
- the hearth stones were not even glued down! We pulled up the carpet to replace the floor and saw that the stones were just sitting atop the concrete slab!

Summer is the perfect time for home improvement projects. Even though a mantel is a feature we often think about in winter, it's the heart of the home and gives it a warm, welcoming feel no matter the time of year, just like Glade® products make a house feel like a home! The first step for a home improvement project like this DIY mantel makeover is a trip to The Home Depot.

We stopped at our local The Home Depot to pick up all the supplies to create our new mantle and fireplace surround, including Glade® Room Spray, Glade® Wax Melts, and Glade® PlugIns® Scented Oil Warmer. Did you know that The Home Depot carries a wide array of Glade® products including favorite scents like Hawaiian Breeze®, Cashmere Woods®, and Clean Linen®? Pick up your favorite Glade scents in a Glade® Room Spray, Glade® Wax Melts, or Glade® PlugIns® Scented Oil Warmer to complete the transformation of your new fireplace.

How do each of the Glade® products work in your home?
- Glade® Room Spray eliminates odors and freshens the air. Each Room Spray is infused with essential oil extracts and comes in a variety of fragrances to make your home inviting!
- Glade® Wax Melts help even your largest rooms fill with a boost of flameless fragrance. Cubes of scented wax melt to release fragrance lasting up to 96 hours.
- Glade® PlugIns® Scented Oil allow continuous fragrance for any size room via the Glade® PlugIns® Scented Oil Warmer. Plug in the warmer for long lasting fragrance and adjust for any size room in your home.
We picked up an assortment of Glade® Room Spray, Glade® Wax Melts, a Glade® PlugIns® Scented Oil Warmer, and Glade® PlugIns® Scented Oil at The Home Depot. We use these all throughout the house to evoke a sense of warmth and home throughout. Now, let's get started on that DIY mantel makeover!

Here's what you'll need to replace your fireplace surround and mantle:
Surround:
- Backer Board
- Backer Board Screws
- Pre-Mixed Thinset Mortar
- Stacked Stone Pieces (Special Order from The Home Depot)
Fireplace:
- High Heat Appliance Spray Paint in Black (flat)
Mantle:
- MDF wood sheets, 1/2″ thick
- Assorted Molding
- White Gloss Enamel Paint
- Paint Brush
- Caulk
- Finishing Nails
- Wood Screws
- Wood Filler
Tools:
- Miter Saw
- Pry Bar
- Hammer
- Electric Drill
- Trowel
- Finishing Nail Set
- Tile Saw
- Measuring Tape
- Pencil
- Level
Start by turning off any gas or power to the fireplace. We switched off the breaker for the fireplace at the breaker box and turned off the gas to the fireplace. Check your fireplace to see if there is a gas shut-off switch. Call your utility with questions before you start this process. Also, be sure to wear eye protection and gloves when handling tools and during demolition.
Here's what our fireplace looked like BEFORE the demolition and remodel:

We removed the dry wall from the mantle area, any nails, and the stone from the stone surround with a pry bar. Remove the drywall only over the area where you want to apply stone. Scrape any leftover mortar from the metal fireplace surround.


We carefully pried the hearth stones up, removed the grout, and carried them to my garden where we re-used them as stepping stones.

Our gas fireplace does not need a hearth since we don't actually open it to place wood inside. Demo the fireplace down to the studs.


Cut the backer board down to cover the studs and any area that was previously covered with drywall. Attach with screws.
Measure the area the mantel will cover. Since our new mantel was slightly larger than the previous mantle, we built the mantel out with mdf sheet, cut to cover the existing drywall mantel. Attach mdf pieces together with screws and attach to the studs with screws. Use a level to make sure the mantel is level before screwing in place.

Dry fit the stone across the bottom left side of the fireplace surround. Use a tile saw to cut the stone to fit. Starting at the bottom left corner of the fireplace surround, use a trowel to apply pre-mixed thinset mortar to the backer board in small sections. Press the left-most stone piece to the mortar and wiggle to ensure the thinset is “stuck” across the entire back of the stone. Gently wiggle the stone piece all the way to the left edge of the fireplace surround and tight against the floor. Continue applying mortar and stone pieces to cover the entire fireplace surround, cutting stone pieces as needed and making sure the stones are pressed tight against one another. Allow to cure for 24 hours.
Apply molding to the mantle to cover any exposed dry wall and backer board. Layer the molding to add detail to the mantel. Apply three coats of white paint to the mdf and molding, sanding between coats.
Spray paint the metal fireplace surround after all the work is finished to avoid scratches or marks from the mortar after painting.

Mask off the stone and wood work, leaving only the metal fireplace surround exposed. Apply a coat of black high-heat appliance spray paint in a flat finish to the metal.

Allow to dry and remove masking. Replace or apply new flooring (that is another post, coming soon!). Now the fireplace and mantel are finished!!


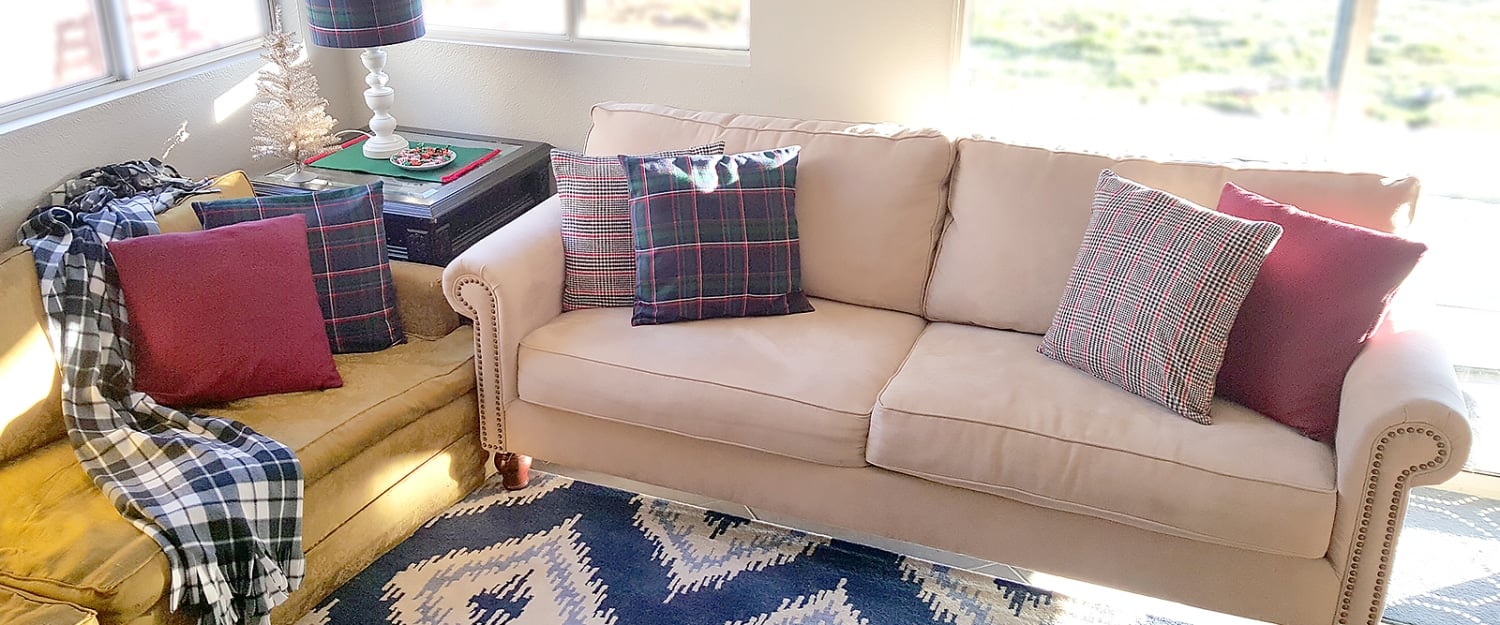
Our entire room feels different with the new fireplace surround and mantel. I now love decorating the mantel all year long and can't wait for the seasons to change so I change the decor!

Sitting in my living room by this fireplace is so relaxing and serene. The whole room feels more airy, fresher, and more modern. And it smells great too, thanks to Glade® products!

Pick up these Glade® products at your local The Home Depot while you're getting supplies for your next home improvement project and make your home complete with Glade®!
What's the ONE home improvement project in your home you want to tackle this year? Let me know in the comments section!
![DIY Mantel with stacked stone surround - make your fireplace look amazing with this DIY tutorial. BEFORE and AFTER photos! Do you have that ONE place in your house that is just so ugly, you can't stand it?! That was our fireplace. NOW, it's one of my favorite parts of my house! See how we transformed the mantel and rock surround from crazy ugly to this modern beauty TODAY at https://www.smartfundiy.com/diy-mantel-makeover/ [AD] #CompleteWithGlade #CollectiveBias](https://www.smartfundiy.com/wp-content/uploads/2016/03/Mantel-Makeover-jenniferppriest.jpg)
![DIY Mantel with stacked stone surround - make your fireplace look amazing with this DIY tutorial. BEFORE and AFTER photos! Do you have that ONE place in your house that is just so ugly, you can't stand it?! That was our fireplace. NOW, it's one of my favorite parts of my house! See how we transformed the mantel and rock surround from crazy ugly to this modern beauty TODAY at https://www.smartfundiy.com/diy-mantel-makeover/ [AD] #CompleteWithGlade #CollectiveBias](https://www.smartfundiy.com/wp-content/uploads/2016/07/Mantel-Makeover-jenniferppriest-470x1024.jpg)
About the Author

Jennifer Priest is a 20+ year designer in the arts & crafts industry and home DIYer with a passion for creativity. An Army veteran raised on a ranch, from her experience, she shares smart DIY projects that save money and fun craft ideas that anyone can make. Besides blogging, Jennifer is a Master Practitioner and Trainer of NLP, Hypnosis, and MER, and coaches other online entrepreneurs on money mindset, business, and living an intentional life. When not blogging, Jennifer is having adventures in the wilderness, on road trips, playing with her cats, and making paleo food.


Wow, congrats to you for taking on such a large intimidating project. The result looks fantastic! Thanks for sharing it.
I love what you have done to your fireplace,what a difference so bright and airy.I particularly like the moulding under the mantle sets is off very nicely.I would like to do my bathroom but as I will be moving house its not worth the expense and I do not have to look at it much as I use the shower off my bedroom.
I absolutely love this facelift!
Great job!! Not a project I would take on…I hate my fireplace too, so 1980’s…but it is a real working fireplace and I need that big old brick thing sticking out into the main floor. Yours looks fabulous though…I have a room for you to stay in if you want to come to mine next?
Alicia
haha!!! We could have left the brick ting if it was necessary but since it wasn’t, we just got rid of it. This wasn’t as hard as it looks or sounds. And it was alot cheaper than hiring someone!!
LOVE how your new fireplace and mantel look!! SO gorgeous! I need to try some new Glade scents in our home. Thanks for sharing!
Your new fireplace looks perfect in your home. What a new, fresh update. Thanks for sharing the tips about Glade, too.
Thank you!! I love those Glade products — so good!
Absolutely beautiful redo, Jennifer!
Thanks!
Love what you done! Ours is an actual wood burning fireplace so there isn’t much to do with it especially since we are in South Texas we don’t really use it but a couple times every 3 or 4 years but I love it. I would love to redo our master bathroom, all that really needs doing is a new vanity and mirror above it and would love some type of track lighting. We had a new bathtub installed 2yrs ago and flooring so the vanity is well over the 25yrs we have lived here. I have a Glad auto sprayer in every room of my house to keep it smelling fresh. I grab a few refills every time I’m at Home Depot. I just love the scents.
Jeri
Thank you!!! Bath remodels are a big deal!!! Sounds like it will be nice when it is all done.
Great job, makes such a difference! thanks for sharing on craft schooling Sunday!
Thank you!