This content may include affiliate links, which means if you click on them, I may get a commission. The cool thing is, there’s no extra cost to you!
3 Summer Jewelry DIYs to Try NOW
Are you ready to soak up the sun in style? This summer, accessories are colorful and layered. Shopping for jewelry usually results in sticker shock. Plus, often times the jewelry I see in the stores is falling apart or poorly made. Only one way to solve that – make it yourself!

You're gonna love these FREE jewelry tutorials – you can customize them however you want, for YOU! Just catch the videos and grab the supply lists below to be on your way to looking fab this summer. This post contains affiliate links.

Bohemian Layered Bracelet
This project brings together the stacked bracelet look with a fun tassel in bright, happy colors for summer. There's a fun trick for keeping this multi-strand bracelet lightweight yet very interesting…. you'll want to watch the video to see how!


For this project, I used a mix of supplies and beads in colors I love for summer. You can make this bracelet with ANY colors and for any season. Here's what I used:
- Semi-precious stone beads
- Striped Beads
- Rosary Chain
- Jump Rings
- Bead Wire
- Crimp Beads
- Jewelry Pliers
Watch this video to see this project in action:
Pop of Color Bracelet with Dangle
If you don't have beads in the color that want, DYE them! I buy lots of beads in white or clear because these can be dyed with solvent based ink. Plastic or acrylic beads are affordable and lightweight. They're also easy to find at Walmart and major craft stores. Since they are so affordable, you can experiment with dyeing them without worrying about wasting money on supplies.

You'll want to choose a solvent ink for this because it dries fast and dries matte. An alcohol ink can “stick” to plastic but it might dry sticky. You don't want sticky ink on your wrist – ew! Pick up these supplies to make this project:
- Solvent based ink reinker (I choose ColorBox Surfacez Ink)
- Acrylic Beads in white or clear (the beads on this bracelet are from Cousin Corp)
- Acrylic pearls in black and grey
- Head Pins
- Jewelry Wire
- Elastic Bead Cord (Cousin Corp)
- Jump Rings
- Pave Crystal Spacer Bead
- Zip top plastic baggies
- Aluminum foil or nonstick craft sheet
- Jewelry Pliers

I work with Clearsnap as their social media coordinator and I work with Cousin Corp as a Creative Circle Brand Ambassador and received this product in conjunction with my partnership with them.
Here's how to make this bracelet:
- Place the beads into a plastic zip top bag. You'll need one bag of beads per color of ink you plan to use. I used 3 colors so I put a couple of beads into 3 different bags.
- Into each bag, one at a time, add a couple of drops of ColorBox Surfacez Solvent Ink. Close the zip top bag. Shake until the beads are coated with color.
- Open the bag and carefully pour the beads onto a nonstick craft mat or sheet of aluminum foil to dry.
- While the beads dry, cut three lengths of elastic beading cord.
- Thread pearl beads onto the beading cord to the desired length (measure your wrist).
- Thread each length of elastic bead cord through a spacer bead and tie off tightly.
- Attach the dyed beads to jump rings, wrap wire wire, or thread onto a head pin and make a loop at the top. Attach all of these as dangles through the spacer bead, using jump rings.
Wear the bracelet and let the pretty dyed beads dangle! My son Matthew loved this bracelet so much, he wrapped it and gave it to his teacher as a gift. She wore it the whole day. It's the perfect little pop of color for summer!
Blingy Felt Bib Necklace

Create this bib style necklace using die cut fabric and vintage jewelry pieces. It might be too warm to use felt for this project so consider using organza or even thin cotton instead. Die cut the leaves and flowers from the fabric, glue them together, and then add beads and broken vintage jewelry to complete the look. No jewelry skills are needed to make this project!
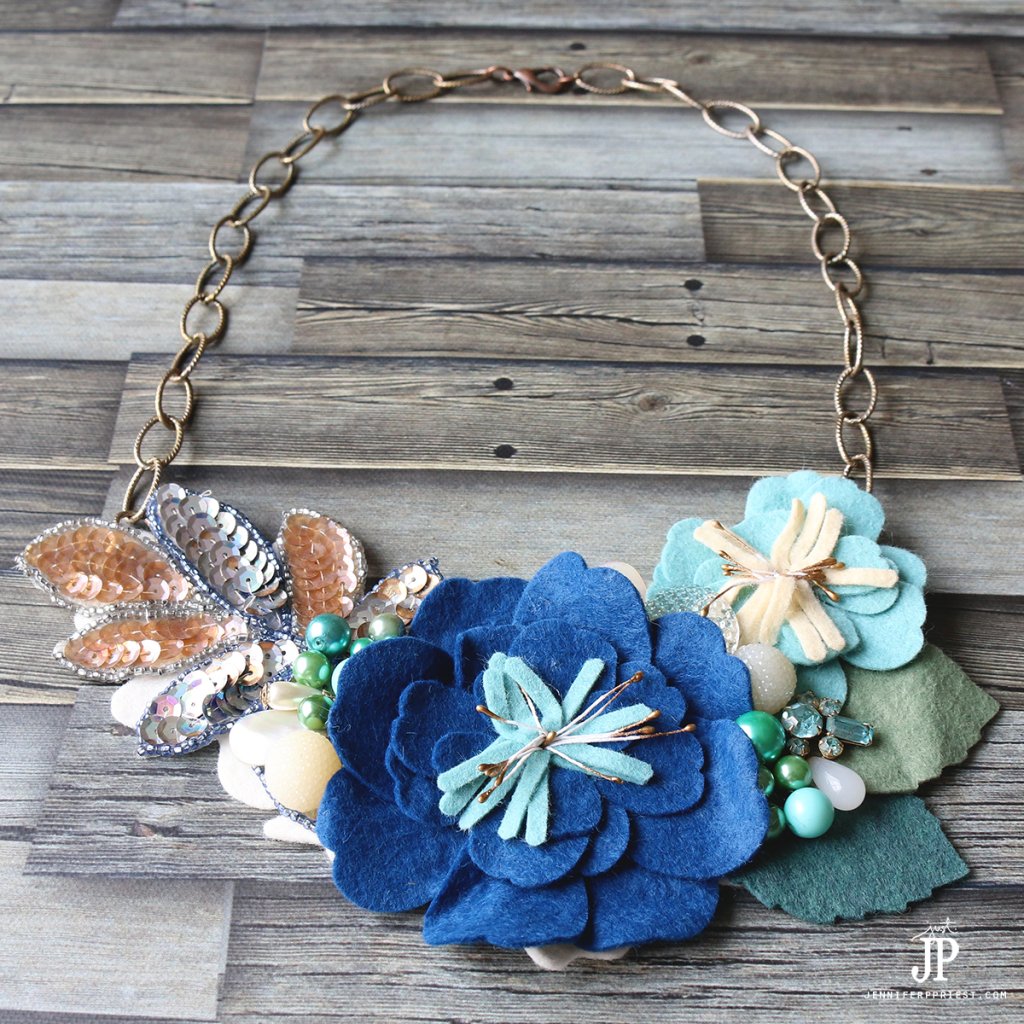
See how to make this felt bib necklace on the Sizzix Blog and watch the video tutorial below:
I hope you enjoyed these fun summer jewelry looks. Let me know which one you like best, in the comments!

About the Author

Jennifer Priest is a 20+ year designer in the arts & crafts industry and home DIYer with a passion for creativity. An Army veteran raised on a ranch, from her experience, she shares smart DIY projects that save money and fun craft ideas that anyone can make. Besides blogging, Jennifer is a Master Practitioner and Trainer of NLP, Hypnosis, and MER, and coaches other online entrepreneurs on money mindset, business, and living an intentional life. When not blogging, Jennifer is having adventures in the wilderness, on road trips, playing with her cats, and making paleo food.