This content may include affiliate links, which means if you click on them, I may get a commission. The cool thing is, there’s no extra cost to you!
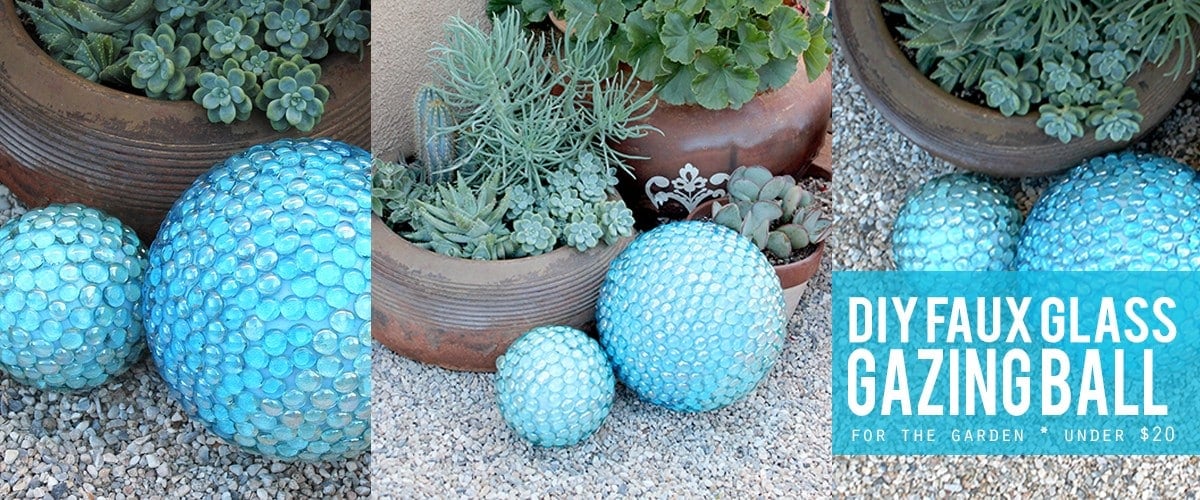
DIY Faux Gazing Ball for the Garden
Press PLAY to watch the video here:
So many people have made these gazing balls with great success! But a few have told me that their gazing ball fell apart after they made it. That's because they used the WRONG SUPPLIES.
It is super frustrating to look for supplies and get the wrong thing.
It's even more frustrating to spend all this time making something to have it fall apart. That's why using the RIGHT SUPPLIES is crucial!
When people tell me they made these gazing balls and they fell apart, 99% of the time, they used the wrong supplies. I don't want you to waste your time and money! I want you to have a gorgeous, unique gazing ball for your garden. It is super super important to start with the RIGHT supplies to make this project AMAZING! Depending on where you use the gazing ball, you will choose different supplies.

If you plan to display the gazing ball INSIDE the house or as temporary garden or party decor, you can use the hot glue method I share in the video.
If you plan to leave the gazing balls outside for any longer than one day or you want to use them in extreme temperatures (colder than 65ºF and warmer than 75ºF), then you HAVE to use different supplies. If you use hot glue on an exclusively outdoor project, it WILL fall apart.
CLICK the NEXT button to see the FULL SUPPLY LIST and an explanation about why each item is important.





Found you on YouTube
Thanks for visiting!!
I made these and all the stones fell of the first time it rained not sure what I did wrong they looked great but I wasted a lot of time for nothing back to the drawing board for me
Sorry that happened – I suggest construction adhesive if you live in a wet weather area. I live in a desert – it rarely rains here. Also you have to use SMOOTHFOAM because if you use styrofoam, it will fall apart right away.
I will try the other glue I hope it works they were so pritty
You must use a weather-proof (water proof) glue.
Love these! Way cute. I’ll have to make some once we get a place here in Arizona. ?
I made a project back in the day with styrofoam balls and a high temp glue gun…it ate right through (aka melted) the styrofoam immediately…won’t that happen here ? :/
That’s why I used Smoothfoam – it’s so much better with hot glue than styrofoam 🙂
Love this idea! Work at Jo-Ann’s and know what I am buying tomorrow after work. Want to do the green pebbles and putting on the thinking cap for the color paint. Don’t want a glitter but something to really add to it.
I just found my new buddy
Looks great, and your planters too! Thanks for sharing on craft schooling Sunday!
What a great idea! They came out really beautiful. I found you at Share it link party!
Thank you so much!
Made these yesterday and love them. However, I wonder how they will hold up in the summer weather? Does water have a negative effect?
Yay so excited that you made them! Some of the beads might fall off with extreme temp changes -Just glue them back on 🙂 You can also use a construction adhesive to hold them on.
You can also put 3 coats of modge podgeover them so they stay on
Yeah I don’t really think that would work … but interesting idea!
I may try making this with some old bowling balls we have lying around….no need to paint them just add some sparkly flat marbles.
I found the answer to which type of paint to use. Now another question, why couldn’t you paint the smoothfoam
ball one color and use flat marbles of another. It might be gaudy or could be interesting. Any opinions?
You totally could do that!
Thank you for the prompt reply.
Just made my first one. Painted the ball sky blue and used clear flat marbles. Beautiful. I’m wondering. How could I fill in the open spaces with seed beads, bugle beads etc.? What kind of glue should I use? hOPE YOU RESPOND soon. Can’t wait to put in my hosta garden. Oh, I found a lot of cool stands at Good Will. Similar to fondue pot stands.
Ge silicone 11 in clear.
That’s what you use for outside and it’s cheaper to use glass light fixtures at yard sales and they can stay out all year round
Thanks!
I did this one year using the construction adhesive on an old bowling ball a friend got from a thrift store for a few dollars! Good way to upcycle unwanted balls 🙂 I used different colored stones to make a flower pattern all over my ball. 🙂
How do you keep them from blowing away?
Hello, They are heavy with the glass marbles on them.
I understand the difference between different Styrofoam – used to work for a florist. Then I saw the comment about bowling balls. Someone gave me some but they’ve gotten dull over the years – NOW I know how to make them look better. Great idea! For garden ball idea & bowling ball idea. Thank you
These are awesome! I have gazillion of those glass pebbles leftover from my daughter’s wedding. I can’t wait to try this.
(1) Would this Smoothfoam (never hear of it before) work with silicone as an adhesive instead of hot glue? Then it would be weather resistant.
Yes it would!
What is construction adhesive? Is there a tube you could use as clear caulking?
Go to the hardware store and ask for clear construction adhesive. You could use clear caulk if it is for outdoor use.
Where do you get smoothfoam
Click the link in the post – goes direct to Amazon. Also JOANN Crafts has it.
Super cool! I found this post on Pinterest and my shade garden sure could use that pop of color. Thanks for the additional information about temperature extremes as I live in South Florida!
You might try old bowling balls…. you can usually find them at thrift stores, bowling ally’s often sell for a buck….. paint it white and glu away. It is heavier but I have had on inmy garden in Colorado for 7 years!
Jennifer, can you use rubber balls or hard plastic balls that children play with for the glazing ball? Bowling balls are hard to come by and I want to make several for outside. I live in NJ so our summers can be hot and humid. I would take them in for the winter.
You could try but they might expand and shrink a little with temp changes and that’s bad for the glue – the gems will fall off. If you plan to use them on the ground, you could use a glass bowl turned upside down and only have “half a ball” sticking up…
Hello, approx. how many flat marbles would it take to cover a bowling ball?
Oh, maybe 4-5 bags? depends on the size of the marbles…
I made this way b4 I saw anything here….problem is. glass beads are so smooth and a glue gun will not hold for very long,
Solution….over glue gun it and let it warp around the glass beads….or later super glue them back in place.
either way works…..
I also found that clear construction adhesives works great too 🙂
Hello Dear
Can the smoothfoam and stained glass mosaic ball be grouted? What type?
Hello, you probably could but for something more permanent, use a bowling ball or concrete ball as a base.
What a fun idea! I bet they look so pretty when the sun hits them, too. Thank you for sharing at Merry Monday!
These are so pretty. I can see how they can be used inside or out. The best part is you tell us what to use for each application.
They really are pretty! Thank you so much for sharing these pretty gazing balls with us at the Hearth and Soul Link Party. Have a lovely week!
I’m excited to try this project. Might I suggest that Patio Paints or equivalent be used? They are water resistant, moreso than the acrylic paints. I live in the Pacific Northwest, so rain is a constant companion! I’ve used Patio Paints on my ceramics and it works perfectly.