
This content may include affiliate links, which means if you click on them, I may get a commission. The cool thing is, there’s no extra cost to you!
How to Choose the BEST Size EasyPress 2 For Me – Cricut EasyPress 2 Review
Find out what size of Cricut EasyPress 2 you need to get and make your first project in minutes. You're gonna be ironing everything once you see how easy this is!
This is a sponsored conversation written by me on behalf of Cricut. The opinions and text are all mine.
How we used to do heat transfers and iron-ons
Until heat transfer vinyl and digital cutters were available to the public in the mid-2000s, making your own custom t-shirts and totes was challenging. You could hokey printable iron-on sheets for the inkjet but who wants to look hokey?
The digital cutters like Cricut started showing up in craft stores. Scout troops, family reunions, and craft nights, you name the event, we were making custom shirts for it with our digital cutters. Designing and cutting the images were so much fun. But the fun stopped with hours of swirling a hot, dry iron over the designs until your arm muscles were shaking so hard you were on the verge of collapse. Even with all that sweat dripping off your brow, you'd discover the iron-on transfer hadn't stuck completely to your project. Argh!
Savvy crafters started buying pro gear, like giant heat presses made for commercial t-shirt operations. While these made the job faster and got great results, they only work with flat surfaces and they're too heavy to move easily. Wanna iron shoes or hats? Nope.
A shining star appeared a couple years ago: Cricut EasyPress. Imagine an iron shaped like a rectangle to help crafters iron a larger area, all at once. It was perfect for heat transfer vinyl projects!
Cricut recently released the EasyPress 2, a new improved EasyPress in 3 unique sizes. Now we have the iron to match the power of our Cricut machines!

This post contains affiliate links – I receive a small commission when you buy from these links and it doesn't cost you anything! It's pretty rad.
What is the Cricut EasyPress 2?
Cricut EasyPress 2 is a rectangular iron device with a large advanced heat plate with a ceramic coated surface to help crafters apply heat to heat transfer vinyl projects of any size. Since the EasyPress 2 weighs more and can reach higher temperatures than a standard household iron, it is more effective at creating successful heat transfer.
Check out these features of Cricut EasyPress 2:
- Works with heat transfer vinyl, glitter, foil, and metallic projects
- Can be used for large and layered heat transfer projects
- Adjustable heat up to 400°F (204°C) with a digital temperature display
- Built-in digital timer with beep alarm
- No press cloth is needed for most materials
- Shuts off automatically after 10 minutes of inactivity
- Applies equal heat and pressure over the full area due to lack of steam holes
- Heats faster than a conventional heat press or household iron
- Insulated base protects work surfaces and keeps users safe during heating and use
- Large handle for easy lifting
- Small footprint for easy storage (compared to a standard 60 lb heat press)
You can use Cricut EasyPress 2 to make projects like this DIY apron in a few minutes:

How to Use Cricut EasyPress 2
The EasyPress 2 works similarly to a standard clothes iron for iron-on transfers:
- Set the EasyPress 2 into the insulated base while heating
- Choose the temperature and time setting to match the heat transfer material and fabric onto which you plan to transfer the design
- Once the EasyPress 2 has reached the temperature you set, place it onto your project, with the heat transfer material positioned exactly where you want the design
- Set the timer for the material you're using
- Wait for the beep that the timer has finished
- Place the EasyPress 2 back into the insulated base
For the best results, apply heat to the back of the design as well, following the same instructions.
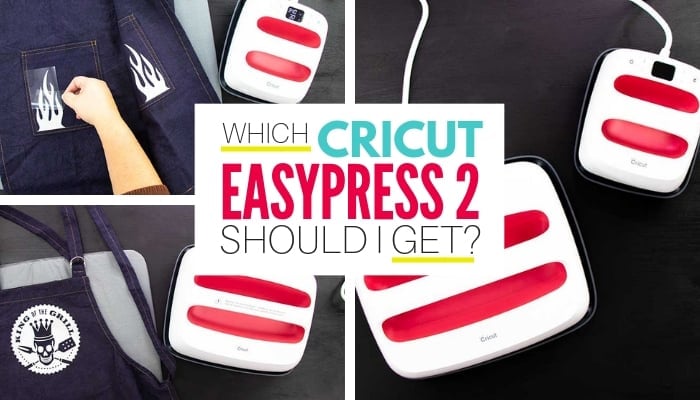
What Size EasyPress 2 Should I Get?
Cricut EasyPress 2 is available in 3 sizes. Each size was created to be used for a specific range of projects.
Here's what each size EasyPress 2 can do:
6″ x 7″ EasyPress 2
- Designed for smaller projects like onesies, gift bags, and shoes
- Weighs just under 3lbs
9″ x 9″ EasyPress 2
- Designed for t-shirts, home decor, tote bags, and more
- Weighs about 5 lbs
10″ x 12″ EasyPress 2
- Designed for larger projects like large t-shirt designs, blankets, and banners
- Weighs about 7 lbs
What would you use an EasyPress 2 to create?
Head on over to my Facebook Group to share what you'd make!
What Materials Can I Use With EasyPress 2?
Apply these materials with EasyPress 2:
- Heat Transfer Vinyl (HTV)
- Rhinestone Transfers
- Metallic HTV
- Glitter HTV
- Flocked HTV
- Heat Transfer Foil
- Patterned Iron-On
- Holographic Iron-On
- SportFlex Iron-On
- Fusible Fabric
- TShirt Transfer Paper or Iron-on Transfers
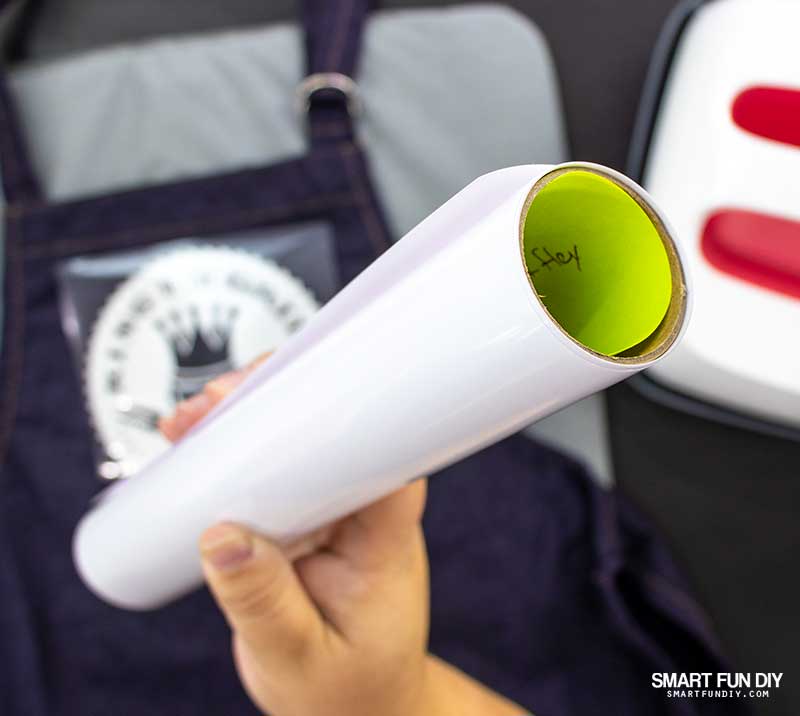
Quick Tip: When you unwrap the Cricut iron-on transfer material from the packaging, there's no label. You'll want to make sure you know the material type for any loose pieces of vinyl in your stash. Here's how:
- Wrap the vinyl back around the tube
- Then slip a sticky note inside the roll with the material type written on it
You can apply heat transfer to these surfaces with EasyPress 2:
- Fabric
- Paper
- Wood
- Silk
- Cardstock
- Canvas
- Burlap
- Jersey Mesh
- and other textured surfaces – see the full list of materials with recommend settings here
For the best Iron-On Heat Transfer Vinyl Results
You've got your Cricut, you just unboxed your Cricut EasyPress 2, and now you're ready to go, right?
Before you get all excited about cutting your first heat transfer vinyl project, you need to know these tips for the best results.

Mirror Image
Heat transfer vinyl is designed so that the digital cutter designs are cut into the back of the material. To apply the iron-on, flip the HTV design over and apply the iron to the carrier sheet side (shiny side) of the HTV.
If you are creating with words or any design that has a distinct direction, you'll need to cut the mirror image of the design so that it's going the correct direction when flipped during this process.
You can create a mirror image of your design in the Cricut Design Space software.
Cricut EasyPress Mat
Protect your work surface from the heat of the iron with a Cricut EasyPress mat. The mats are designed to fit each size of the EasyPress 2. You could also use a towel to protect your work surface but the EasyPress mat eliminates moisture and directs heat to the iron-on design, which a towel can't.
Find out more about Cricut EasyPress mats here. Become a Cricut Access member and get 10% off supplies like EasyPress mats.
Teflon mat or parchment paper
Create multi-layer designs with multiple colors of vinyl. To ensure that the vinyl does not lift off the fabric as you add each consecutive layer, place a teflon sheet between your project and Easy Press 2. Parchment paper can also work.
Weeding tools
Intricate vinyl designs have tiny pieces that are difficult to remove from the design before ironing on. The process of removing the unwanted bits of vinyl from the design is called “weeding”. Weeding vinyl designs is much easier with the proper tools. Luckily, Cricut offers this Weeding Tool Set made specifically for vinyl weeding.
![]()
Cricut BrightPad
It can be difficult to see the cut lines on vinyl and heat transfer projects, making the weeding process extra challenging. Glitter material is especially difficult to see as light shines through the glitter and the cut lines.
Cricut BrightPad is an ultra thin light box that illuminates hard-to-see cut lines on vinyl designs. Lighting the cut vinyl from behind makes it easier to weed away the bits you don't want and avoid accidentally removing the parts you want to keep.
What's the difference between Cricut EasyPress and the Cricut EasyPress 2?
The EasyPress is the original tool, while the EasyPress 2 is a new improved version available in 3 sizes. Ken's Kreations made this excellent video showing all the differences and improvements:
How to Make Your Own DIY Iron-On Transfer Designs
My husband has been wanting a new apron for barbecuing for years. When I saw a navy blue canvas apron on sale at the craft store, I knew it would be perfect except for one thing: it was so BASIC. My husband found an image he liked off a stock photo site, I purchased and downloaded the file, and I was off to the races cutting it with the Cricut Maker. Ten minutes later, he had a custom apron design he loves!

I even put flames on the pockets!
Creating custom iron-on transfer designs is super easy with Cricut Maker and Cricut EasyPress 2. No matter the project, you can make the world your own with any design you like.
Here's what you'll need to get started making your own iron-on transfer designs:
- Cricut Maker – read my full review and get the how-to here!
- Cricut EasyPress 2
- Cricut Easypress mat
- Cricut Strongbond Everyday Iron-On
- Cricut BrightPad
- Cricut Weeding Tool Set
- fabric project to apply iron-on transfer
- lint roller
How to cut heat transfer vinyl:
- Create your design in the Cricut Design Space app
- Measure the place you'd like to apply the heat transfer design
- Size the design in Cricut Design Space app to fit the physical item
- Place the heat transfer vinyl onto the Cricut mat, shiny side down
- Click the “Make It” button in Cricut Design Space
- Choose to “Mirror Image” the design if you have not already flipped it in Design Space
- Select the material (heat transfer vinyl)
- Load the Cricut mat into the Cricut Maker
- Press the Cricut button on the Cricut Maker to cut
- When finished cutting, push the double arrow button on Cricut Maker to remove the mat and click “Finish” in Design Space

After cutting, weed away excess vinyl from the design:
- Trim any separate designs away from one another with scissors
- Lay the cut vinyl shiny side down onto the Cricut BrightPad
- Using weeding tools, peel away the excess vinyl, taking extra care to avoid removing any of the final design by mistake

Finally, apply the iron-on transfer to your project:
- Remove any excess lint from the fabric with a lint roller
- Position the cut vinyl shiny side up on the project surface, using a measuring tape to ensure the design is centered or positioned exactly where you want it
- Place the project onto the Cricut EasyPress mat
- Heat the Cricut EasyPress 2 to the proper temperature for the heat transfer material and fabric type of the project
- Set the Cricut EasyPress 2 on the iron-on transfer (shiny side up) and press the Cricut button to start the timer
- When the EasyPress 2 beeps, remove it from the project and replace it in the insulated base
- Turn the project over
- Set the Cricut EasyPress 2 on the back of the project where the iron-on transfer was applied and press the Cricut button to start the timer
- When the EasyPress 2 beeps, remove it from the project and replace it in the insulated base
- Remove the plastic backing from the vinyl

My husband absolutely loves his custom apron. I turned a basic kitchen supply into a super cool custom gift he'll use and treasure for years.
Make this Father's Day extra special by giving Dad a DIY Grilling Gift Box filled with spices, tools, and … this apron!
In Conclusion …
Glitter, patterned, and sport vinyl, there's no limit to the creativity you can find with Cricut EasyPress 2.
Iron-on wasn't even on my radar as far as a craft I thought I'd be doing this year. Hands down, the 6″ x 7″ Easy Press 2 is my favorite craft tool of 2019! Here's why:
- Easy to use
- Lightweight
- Makes ironing fun (I know, so crazy!)
- Get consistent perfect results every time
I can see myself using EasyPress 2 to make iron-on projects for so many of my gifts and my home decor projects. Hide your shirts, stow your socks, and put away your pillows because I've got an EasyPress 2 and I'm not afraid to use it!
Find out more about Cricut projects and tools here.
If you found this post helpful, I' love if you share it on Facebook and Pinterest:

About the Author

Jennifer Priest is a 20+ year designer in the arts & crafts industry and home DIYer with a passion for creativity. An Army veteran raised on a ranch, from her experience, she shares smart DIY projects that save money and fun craft ideas that anyone can make. Besides blogging, Jennifer is a Master Practitioner and Trainer of NLP, Hypnosis, and MER, and coaches other online entrepreneurs on money mindset, business, and living an intentional life. When not blogging, Jennifer is having adventures in the wilderness, on road trips, playing with her cats, and making paleo food.


4 Comments