

This content may include affiliate links, which means if you click on them, I may get a commission. The cool thing is, there’s no extra cost to you!
Fast Christmas Cards with Clique Kits and Tombow #Sponsored
I love sending handmade cards to friends and family during the holidays. Over the years, everyone has come to expect a handmade card and my list has grown to over 100 people who I send cards to at Christmas time. It's a challenge to get all of those cards done but I've developed a really easy assembly line system to help me create unique cards fast.

I created these 8 cards in about 30 minutes using Tombow USA Adhesives and the Clique Cards Holiday Edition Kit.
The teams got together and created LOADS of beautiful holiday and Christmas projects using Tombow USA Adhesives and the Clique Cards Holiday Edition Kit. Be sure to hop through to all the blogs in order to enter to win the TWO amazing prize packs up for grabs. When I received the kit, I knew I was going to make cards. The papers and embellishments were all perfectly coordinated which makes creating with the kit super easy.

You'll need the following supplies to make these cards:
- Clique Cards Holiday Edition Kit
- Tombow MONO Adhesive Permanent
- Tombow MONO Adhesive Vellum
- Tombow Foam Tabs
- Tombow Xtreme Tabs
- Tombow MONO Multi Liquid Glue
- Tombow Xtreme Adhesive
- Tombow Blending Kit
- Tombow Dual Brush Pens
- Tombow Foam Tape
- Paper Trimmer
- Scissors
Watch the video above to see how I made these cards from start to finish. I really only took 30 minutes to create all 8 cards!

Follow these tips for creating handmade Christmas cards in bulk:
Cut all the card bases the same size. You can cut some of the cards to open vertically and others to open horizontally but cutting the bases the same size makes it easier to cut papers to fit the cards and easier to design from one card to the next because everything is the same size. For example, from an 8.5 x 11 sheet of cardstock you can cut two A2 cards that measure 5.5″ x 8.5″ each OR cut two cards that measure 4.25″ x 11″ each. When folded, both of these card bases are A2 sized at 5.5″ x 4.25″. The paper used to cover the fronts of these cards is the same size for both.
Cut the papers for the fronts of the cards all at once. I like to stack my card elements – I put the card base down on the table and stack the papers I want to use on it on top. Then I repeat the process with the next card. This helps keep things in order for the next step.
Once all the card fronts are cut, glue them to the cards. Do this all at once – glue the fronts on all the cards on.
Embellish the cards with stickers, brads, die cuts, ribbon, and more. Use Tombow Foam Tabs to create dimension when adding items to the fronts of the cards.

Creating ombre wood veneer die cuts:
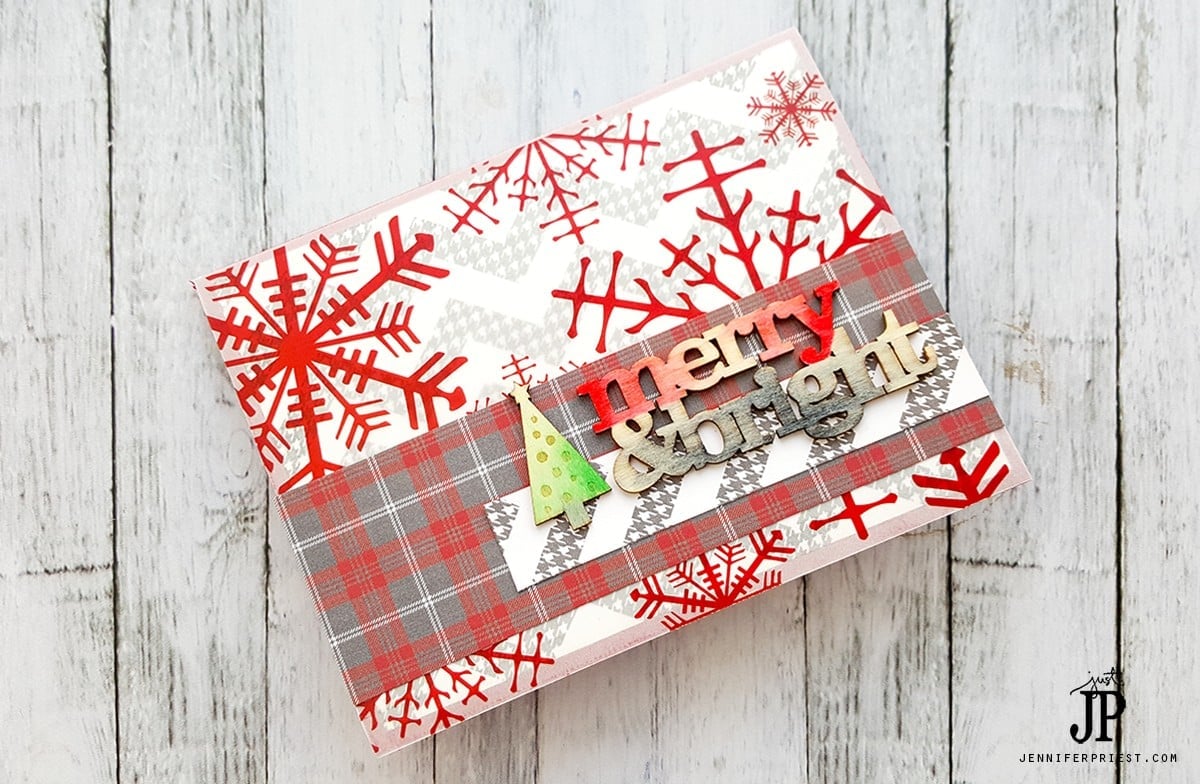
To create an ombre effect on the wood veneer die cuts from the Clique Cards Holiday Edition Kit I used Tombow Dual Brush Pens and the Tombow Blending Kit. Color on the Blending Palette with one of the Dual Brush Pens. Pick up the color with a Blender Pen. Color the wood veneer from one side to the other. The color will fade as it slowly transfers to the wood from the Blender Pen.

Repeat with various colors like I did on the word die cut on this card or use a single color to create a shadow effect, like I did on the Christmas Tree wood veneer shape. On the word “merry”, I colored from the outside edges towards the center with the Blender, loaded with red ink. For the words “& Bright”, I colored from the center of the word out towards the right and then out towards the left to create a reverse ombre effect.

About the Author

Jennifer Priest is a 20+ year designer in the arts & crafts industry and home DIYer with a passion for creativity. An Army veteran raised on a ranch, from her experience, she shares smart DIY projects that save money and fun craft ideas that anyone can make. Besides blogging, Jennifer is a Master Practitioner and Trainer of NLP, Hypnosis, and MER, and coaches other online entrepreneurs on money mindset, business, and living an intentional life. When not blogging, Jennifer is having adventures in the wilderness, on road trips, playing with her cats, and making paleo food.


I love the cards!
I actually have this paper already, and you’ve given me some great ideas!
That’s great! Can’t wait to see what you make 🙂
Load all your cards they are beautiful
Fabulous cards Jennifer! I love how you colored the wood veneers.
Those wood veneers are so fun!
Wow! 100 handmade cards?? That is impressive! And these cards are beautiful!!! I adore that one with Santa and the bow and the Noel!!
Loved these cards! You really expired me!
Just gorgeous! Love the veneers!
I don’t have that many cards to make – but enough that I was dreading getting started.
while going through my Christmas stash I found several kits so I got those out, embellished them
my way, and got a lo of cards done in a little amount of time.
Your cards are wonderful.
thanks for sharing.
Oh thank you Mary! I’d love to see your cards 🙂
wow! These cards are awesome!!!
Awesome cards! Thank you for taking the time to do a video. ♥♥♥
love the cards
I love the tips for mass production–could come in handy someday! I love the ombre wood veneers!
Thank you so much for the tips on making quick cards in bulk!! I LOVE the eclectic mix of colors and patterns that look so fabulous together. Love your ombre veneer!
<3 J
jwoolbright at gmail dot com
HerPeacefulGarden.blogspot.com
Great project & loving the blog hop too 🙂
Wow! You are one fast card-maker! I wouldn’t be able to do this under 30 minutes, an hour and 30 minutes perhaps lol! 😀 These are all pretty. Thanks for the inspiration!
What awesome cards!!!
Thanks!
WOW… Your cards are beautiful and festive!!!!! Fabulous set!
WOW! 100 cards! That’s amazing! And you seem to keep up quality and variety! I would loose focus after coming up with only a few designs and about 10 cards in! lol
I can’t wait till I’m as good as half of you ladies & gents who make some very amazing cards! 🙂 ?