
This content may include affiliate links, which means if you click on them, I may get a commission. The cool thing is, there’s no extra cost to you!
How to Color Stamps with Tombow Dual Brush Pens – A Waffle Flower + Tombow Blog Hop
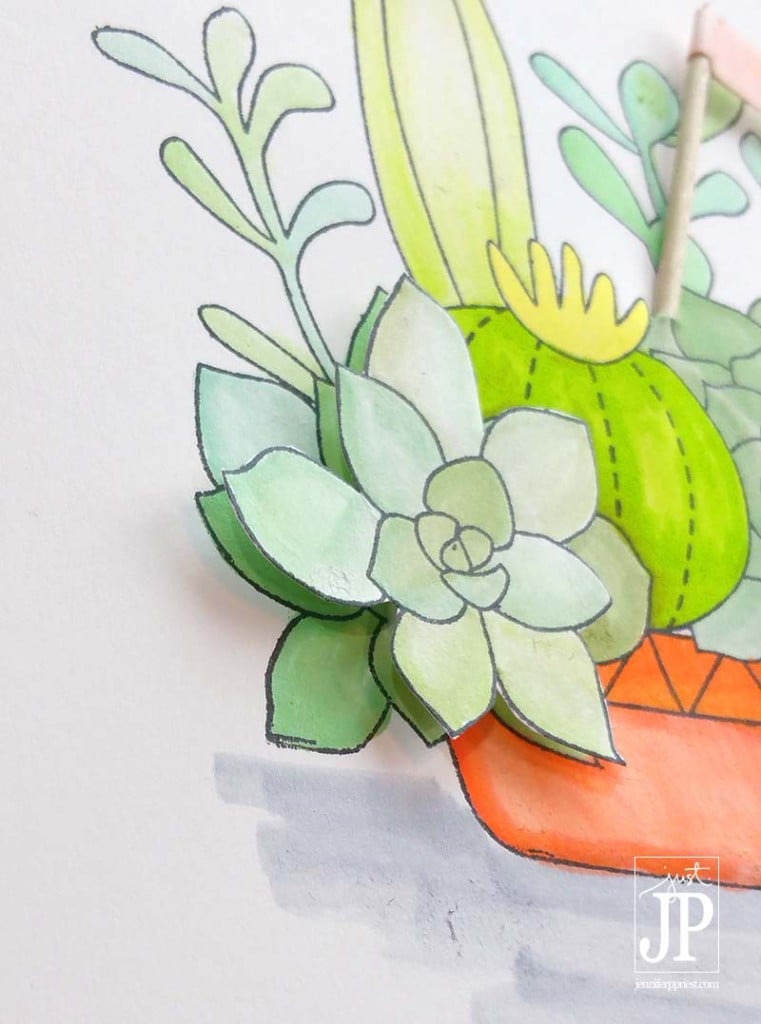
Have you wondered if you can color stamped images with markers that are not alcohol-based? Waffle Flower and Tombow recently sent me some stamps and markers to play with and I am loving the results! Using a combination of the Tombow Blender Pen and Tombow's Dual Brush Pens, I was able to achieve dimensional coloring on this gorgeous succulent stamped image. By using the Blender, I was able to get a very light look to the leaves and cacti in this image, giving them a more realistic look.

Since Tombow Dual Brush Pens are water-based, they can blend with one another, with the Blender, and with water to change colors, make new shades, and achieve lighter hues than the original pen color. The secret to creating new shades and lighter shades is the Tombow Blending Palette. Here's how:
- Dual Brush Pen on Palette + Blender = Lighter color as your color onto paper with the Blender (tall skinny yellow cactus)
- Dual Brush Pen on Palette + Dual Brush Pen = Picks up the color on the Palette, blending with the Dual Brush Pen onto paper (short green cactus in front)
- Dual Brush Pen on Palette + Dual Brush Pen on Palette = Blended color. Pick up and blend the color with a third Dual Brush Pen OR a Blender (succulents in back)
To get the color onto the Palette, simply “color” it on, as if scribbling on a piece of paper. To get a rough look to the paper, keep coloring until the paper pills up onto itself. If you don't want the paper to pill, don't color as intensely and allow the paper to dry before adding more color.
Here's how I created this card (click HERE if the video does not play below):
For even more dimension, I stamped a second image, colored portions of it with the Tombow Dual Brush Pens, and then cut out the portions and mounted them to the card using Tombow Foam Tape. For the flag, I stamped a sentiment onto a scrap of white paper, colored it with a Tombow Dual Brush Pen for a little color, added Tombow Xtreme Adhesive to the back, and wrapped the strip around a toothpick to make a flag. I punched a hole in the card with a pair of scissors and slid the toothpick into the front of the card.
Here are all of the supplies needed to create this card:


Supplies:
- Tombow Dual Brush Pen N-00 Blender
- Tombow Dual Brush Pens, Assorted
- Tombow Blending Palette
- Tombow Foam Tape
- Tombow Xtreme Adhesive
- Waffle Flower Crafts “Potted” Stamp Set
- Acrylic Block
- ColorBox Archival Dye Ink, Wicked Black
- Scissors
- Toothpicks
- White Cardstock
About the Author

Jennifer Priest is a 20+ year designer in the arts & crafts industry and home DIYer with a passion for creativity. An Army veteran raised on a ranch, from her experience, she shares smart DIY projects that save money and fun craft ideas that anyone can make. Besides blogging, Jennifer is a Master Practitioner and Trainer of NLP, Hypnosis, and MER, and coaches other online entrepreneurs on money mindset, business, and living an intentional life. When not blogging, Jennifer is having adventures in the wilderness, on road trips, playing with her cats, and making paleo food.


What a beautifully colored images, the markers indeed give a water color effect.
This is cute! Love that portions of the cactus is raised
WOW Jennifer, your card is beautiful. (I guess I need Tombow markers! And I didn’t know they had a blender pen???) Thanks for sharing this!
The coloring is so pretty and smooth! Loved the whole effect of the card. Perfect card to go with a gift!
I love succulents! I have this stamp set on my wish list. What a fun way to color them in and send on a card! I will also start following you on Instagram. I just started using it and it’s just for crafty inspirtation!
LOVE the succulents and the 3d element!! Thx for the vid!
Your video makes it look so easy! I hope to find the Dual Brush Pens soon so I can play with them.
Beautiful colors….I love the layered part to add dimension.
I love your card! I have become obsessed with succulents recently.
FUN FLIPAGRAM! Lovely dimension on your card.
Thanks so much!
Thank you for sharing with us, Jennifer. Your creation is beautiful.
Beautiful!
What a great card, especially now when succulents are all the rage.
This is gorgeous!
Love the cacti. Wonderful card.
Great coloring and thanks
for explaining them!
Carla from Utah
Wow! Love how the plants look after computing and adding some foam tape to make them pop
Wonderful card. The Tombow markers have such vivid colors and the stamp set is one of my favorite.
Love your coloring and how terrific your card came out!! Great tutorial!
What a gorgeous card!! Love your coloring!
Love the coloring, and your style. Thanks for sharing.
I love the shading on the card. Popping parts of it off the card always makes a better card.
Would love to try these pens. They seem to be doing a great job on all of the posts.
thanks for sharing.
Spectacular coloring techniques!!! What a lovely succulent arrangement.
<3 J
jwoolbright at gmail dot com
HerPeacefulGarden.blogspot.com
Wow, the 3d effect is awesome!
Oh, Oh, WOW – so gorgeously done – your coloring looks so amazing and I love that you used both products in the project!! Just so superbly done!!!
Thanks!
Wonderful coloring of these succulents. I like the dimension too.
Great card! I loved how the flipagram showed a peek at your process. I really need to learn how to use markers better. I like the soft look of the TomBow Brush pens. Adding them to my wishlist.
Such fun cards!
Oh these are colored perfectly! Love it!
These pens look great. Fab colour on the cacti. Hugz
thanks for sharing the water color technique, appreciated
There are days I wish I was more artsy. Such a cool concept.
This project came out so nice. I love the colors you chose. What a great giveaway. Thanks for sharing!
That flower project is pretty! I’ll have to check out that blog hop!
So pretty! I love the 3-D look you created. Will definitely be adding these to my crafting want list!
Thanks for sharing! The project turned out beautifully!
This is such a cute card! I’ve always wanted to try making cards but I am afraid I don’t have enough patience to make it happen!
Thanks so much! I don’t have patience either. This way of coloring is pretty quick and it’s just one stamp and one layer 😉 Thanks for visiting!
This is a super cute card! I love the watercolor technique you used!
ooh very pretty!
Havin fun hopping along!
OMG!! I need these markers! Love your vid and the sweet card you made. These stamps are darling. I love everything succulent-related!!
Thanks so much!!
Love your card Jennifer. Thanks for the tips on coloring with the Tombow markers. I have to admit that I’ve been a bit afraid to try coloring with markers, but you’ve shown how easy it can be.