

This content may include affiliate links, which means if you click on them, I may get a commission. The cool thing is, there’s no extra cost to you!
How to Shade with Colored Pencil – Jack-O-Lantern Card with Stampendous and Tombow
Since I started using coloring books for grownups, I have found that I really like coloring with colored pencil. One of the things that I've started to really enjoy is blending the colors to make more realistic and dimensional shapes. Today I am sharing a Halloween themed card that shows how to shade with colored pencil:
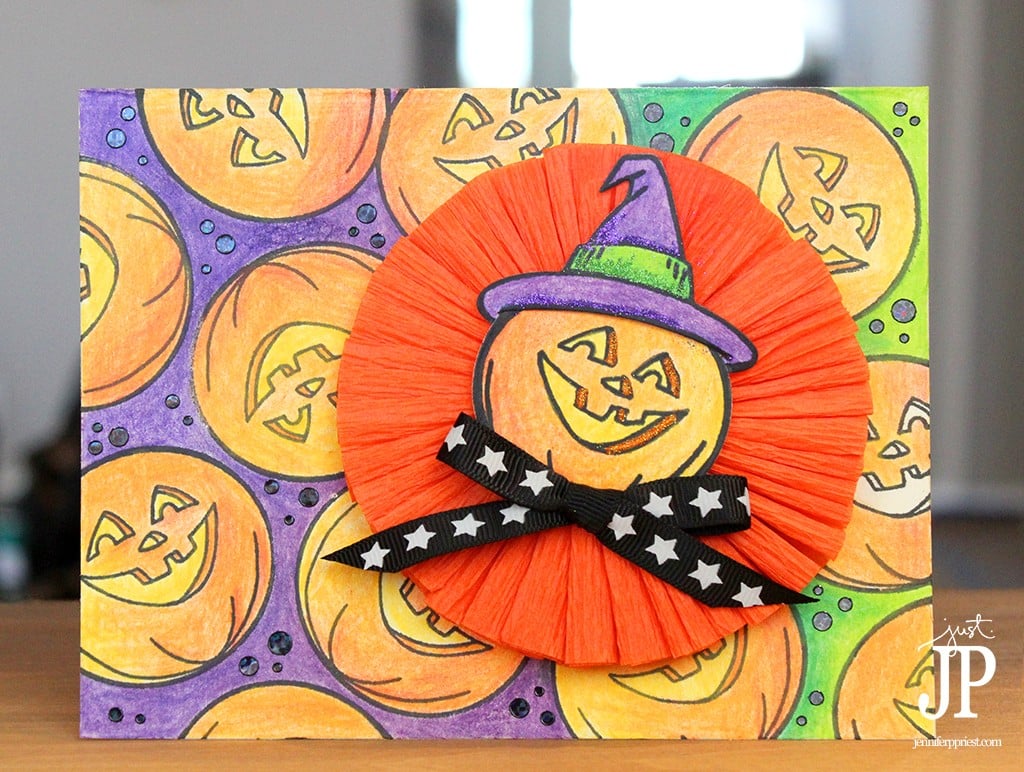
Tombow colored pencils have a waxy base, which makes them super easy to blend. Because they are a traditional colored pencil, they don't need water or anything else to make blending happen. Color one section of the paper with one color and then color over top with a second color to blend. You can keep layering the color until you get the vibrant hue you were searching for. Use a Tombow MonoTwin Permanent Marker to trace over any stamped images that get dulled during coloring. The entire background of this card is colored with Tombow Recycled Colored Pencils. Here's how:

The stamps I used have a matching die set so after I colored in one of the pumpkins, I used the die set with the Sizzix Big Shot to cut it out. I then used Tombow's glue pen to add glitter accents to the pumpkin's hat and face with Stampendous glitter. Finally, I added the STICKERS to give the background a bit of sparkle.

I also used a crepe paper rosette on this card front. These are easy and fun to make – you can even make double layer rosettes! I wrote a guide on how to make the best crepe paper rosettes and you get it on etsy as an instant download.
Supplies:


About the Author

Jennifer Priest is a 20+ year designer in the arts & crafts industry and home DIYer with a passion for creativity. An Army veteran raised on a ranch, from her experience, she shares smart DIY projects that save money and fun craft ideas that anyone can make. Besides blogging, Jennifer is a Master Practitioner and Trainer of NLP, Hypnosis, and MER, and coaches other online entrepreneurs on money mindset, business, and living an intentional life. When not blogging, Jennifer is having adventures in the wilderness, on road trips, playing with her cats, and making paleo food.


This is the CUTEST jack o lantern card! It looks adorable as pattern paper with a great color gradient to it. This card is fantastic, thank you for sharing your creativity with us in the hop this weekend!
Thank you so much!
LOVE how you colored the pumpkins!!! They are so pretty! I love the die cut pumpkin on top of the rosette!! This is a fun and whimsical card! TFS!
Thank you!!! I have a thing about putting heads in the middle of rosettes LOL
Great card!! I can’t believe summer is over either! Really great job! TYFS 🙂
Thank you!
Your card is super fun and so beautiful!!!!
This is so pretty!I love the rosette that you added. It’s the perfect embellishment.
Thanks!!
Very cute card. How clever to use the rosette. USA
I was just looking through my stash for paper for some Halloween cards I was making.
Saw that same paper you used for your background.
It’s a fun design.
Love the card. It’s happy and bright.
thanks for sharing.
Illinois
Actually, this wasn’t paper – I stamped and colored the background with colored pencils 😉
How fun and colorful. I like the crepe paper rosette.
Sue in Ohio
Such a fun Halloween card! Love the jack-o-lantern background you created! Fabulous coloring!! Thanks for the video!
Such a cute card. Thanks for sharing your tips with us today!
Thanks for the technique tutorial. Love this pumpkin card
Jennifer your card is so vibrant and fun. Just looking at it makes you smile 🙂 Texas
What bright colors!
Florida
This is such a fun card! I love how you colored the jacks and your video was great! Super cute!
What a fun card and so many great tips on coloring your designs. Great job. Thanks
FUN & FABULOUS card 🙂
LOVE your CHEERY design and VIBRANT colours, your colouring & shading is FABULOUS, LOVE the rosette too!!!
Tracy from Victoria, Australia